
| Version 21 (modified by , 16 years ago) ( diff ) |
|---|
A CUPS and eCS (OS/2) How To
Revision 1 14/08/2008
Author: Peter Brown
Revisions to filenames 29/12/2008 - Paul Smedley
Revisions to USB section 29/03/2009 - Paul Smedley
Revisions to the list of required software and breif description of software sections 11/04/2009 - Ed Durrant
Further additional data around set up using USB interface 12/04/2009 - Ed Durrant
email: losepete@…
CONTENTS
Brief Preamble
Why install CUPS? - and what is it?
List of required software
Brief description of the software packages
Installation
Configuration of CUPS Printer
Local printers - Parallel attached
Local printers - USB attached
CUPS printer install - Network attached and USB attached
Step by step CUPS printer setup in web admin program (USB or Network connected)
Creating a Desktop Printer Object to use with CUPS
Brief Preamble
Hopefully this text will provide a clear enough "How To" for anyone to be able to follow.
I am using my experience of getting a Canon PIXMA iP4000 inkjet printer working with, firstly, CUPS and then creating an OS/2 Printer Object that is capable of outputting print jobs through CUPS.
I do use specific Drive Letter(s) in the following text that may need to be changed to reflect the correct drive letter on your systems. Most of the Paths used are specific to the CUPS installation; those that are not may need to be changed for your systems.
Why install CUPS? - and what is it?
Common Unix Printing System answers the "what is it?" bit.
What does it support? - here's the list of supported printers under gutenprint: http://gutenprint.sourceforge.net/p_Supported_Printers.php and under Splix:
Why install CUPS? - Simply because it is capable of supporting a lot of modern printers and is being continually updated to support more. The old OS/2 printer drivers are not that good with new printers. If you are lucky enough to find a driver that works with your modern printer that drivers will not be updated to take advantage of all the features whereas the CUPS driver will.
CUPS can provide drivers for more current printers - and should provide many extra capabilities missing from the OS/2 drivers.
The object of the exercise is to end up with an eCS(OS/2) postscript printer object that prints using CUPS.
List of required software
CUPS port - See http://svn.netlabs.org/ecups/wiki/CupsPort for the latest releases of CUPS, Ghostscript, Gutenprint, eCUPS, Cups.pdr and Splix(for Xerox printers only)
eCUPS printer driver package - see http://svn.netlabs.org/ecups/wiki/CupsPort for the latest release
eCUPS printer port - http://download.smedley.info/cupsportdriver-20080628.zip
Libc files required for CUPS - ftp://ftp.netlabs.org/pub/gcc/libc-0.6.3-csd3.zip
Libc files required for eCUPS printer port - http://download.smedley.info/libc064x.zip
GCC files required if supporting Xerox printers using Splix - http://smedley.info/gcc432.zip
PRNDRV.EXE (this is a program that will "clean up" printer entries in the INI files) - http://www.os2site.com/sw/comm/faxworks/prndrv.exe
USB backend (if you are intending to use a USB connected printer) - http://download.smedley.info/cups-usb-backend-20090309.zip
Brief description of the software packages
CUPS consists of several packages that work together to provide postscript printing on raster printers
(CUPS, Ghostscript, Gutenprint, eCUPS, Cups.pdr and Splix(for Xerox printers only)).
The Libc and GCC files are required support files (GCC required by Splix).
PRNDRV.EXE - a useful command line utility for listing installed printers and deleting those that are no longer wanted
The eCUPS printer driver is an alternative OS/2 pscript.drv package and has most of the popular CUPS PPD files already included and can be updated as new printers gain support in CUPS.
The eCUPS printer port driver provides the "hook up" between the OS/2 Printer Object created from the eCUPS printer driver and the CUPS printer. That is OS/2 knows how to talk to ports that printers are connected to. In this case we are implementing another type of port to be available alongside the parallel printer port, the network (lpr) printer port, the serial (RS232) printer port and so on. This driver allows the OS/2 print "engine" to talk to the CUPS daemon which it turn talks to the physical printer either over the network or over a USB connection. (note: we don't use the OS/2 USB Printer port driver when using a USB attached printer via CUPS - we always use the CUPS port driver and then let the CUPS daemon controls the physical IO traffic to the printer). So the data flow is as follows
PRINTER <-> IO Driver "backend"(network or USB.exe) <-> Cups daemon(CUPSD.exe) <-- CUPSD Admin webpage (config,test print etc.)
and
PRINTER <-> IO Driver "backend"(network or USB.exe) <-> Cups daemon(CUPSD.exe) <-> eCups Port Driver <-> eCUPS Printer Driver <-> OS/2 printer support <-> OS/2 Application.
Installation
Put the PRNDRV.EXE file somewhere that you can find it; I put it into J:\Programs\Utils\PrnDrv
The libc0*.dll and GCC*.dll files should be put into a directory specified within the libpath either \ecs\dll or \os2\dll are good choices.
The basic CUPS Install consists of unzipping the packages in the root directory of a drive (doesn't have to be the boot drive):
- Ghostscript needs to be unzipped into \gs - so that you end up with for example, x:\gs\gs8.64 (some zip packages contain the \gs upper directory, some don't so make sure you end up with the correct directory structure).
- cups-1.3.9*.zip needs to be unzipped into ROOT creating the \CUPS directory
- gutenprint*.zip needs to be unzipped into ROOT creating the \Gutenprint directory
At the end of this process, you should have 3 new directories of the root directory of your chosen drive: \cups, \gutenprint and \gs
Have a read of the \cups\readme.os2 before proceeding to get an idea of what you are going to do; especially if attempting to setup a USB printer.
Other files can be unzipped now or later as they are required as follows:
The eCUPS printer driver should be put into a directory under \OS2\DLL - my suggestion is \OS2\DLL\CUPS - you will then point the printer install dialog at this directory during the install process.
The eCUPS printer port driver - copy cupslpr.exe into \tcpip\bin and cups.pdr into \os2\dll
Configuration of CUPS Printer
Local printers - Parallel attached
CUPS does not currently support printing directly to Parallel printers but there is a workaround.
1] Create a Printer object using the Null printer driver and select the LPTn port as the Output Port in the printer object Properties
2] Start the OS/2 lpd daemon (\tcpip\bin\lpd.exe). To prevent lpd.exe from printing the control file page (an almost blank page with few lines of information good only for debug purpose) specify also the "-c" parameter.
When creating the CUPS printer in the below section (CUPS printer) use lpd://localhost/<printer_name> as the Device URI: where <printer_name> is the Physical name of the OS/2 Printer object - as shown on the Properties, View page - created in 1] above. Note this may not be the same as the name given to the printer during creation.
eg If you created a printer with the object name Canon iP4000 in the Printers folder open the Properties for that printer and check the name displayed on the View page - it shows CanoniP4 here. So in the above example the device URI should be
lpd://localhost/CanoniP4
Thanks to Rodney and others who supplied the above information regarding using locally attached printers with CUPS.
Local printers - USB attached
If you have a USB cable attached printer load the USB backend expand the zip file into the \cups\lib\cups\backend directory. Now go to this directory on the command line make sure your printer is turned on and run usb.exe with no parameters and you should get a display something like this:
[J:\cups\lib\cups\backend]usb.exe
INFO: list_devices
INFO: usb_find_busses=1
INFO: usb_find_devices=1
INFO: open_device
direct usb://HP/Officejet%206300%20series?serial=CN88TFB0P504J4&interface=1 "HP
Officejet 6300 series" "HP Officejet 6300 series" "MFG:HP;MDL:Officejet 6300 ser
ies;CMD:MLC,PCL,PML,DW-PCL,DESKJET,DYN;1284.4DL:4d,4e,1;CLS:PRINTER;DES:Q8061A;S
N:CN88TFB0P504J4;S:038000C484001021002c1800007c2880011;J: ;Z:
0102,0503d549016449,0600;BT:000000000000,4F66666963656A6574203633303020736572696
573,0000008F,60;" ""
INFO: close_device
If you don't get such a display, check that your USB support is working correctly and that you have connected the printer with a known good cable to a known good port.
By putting usb.exe into the backends directory when cupsd.exe starts it knows that when asked by the web administration page, that it should check USB ports as well as network and other ports for new devices.
CUPS printer install
Start \cups\sbin\cupsd.exe
I created a program object for this with the Start Minimized and Close Window on exit checked in the Properties, Session tab; the object Properties should also have the Working directory set as Drive:\cups\sbin (where Drive is the drive letter that cups is installed to). This object can be put in the Startup folder so that cupsd.exe is started automatically at bootup.
You can of course also auto start this at boot-up by putting the following lines in \startup.cmd (or in the network startup file \MPTN\BIN\setup.cmd)
CD \cups\sbin
start /min cupsd.exe
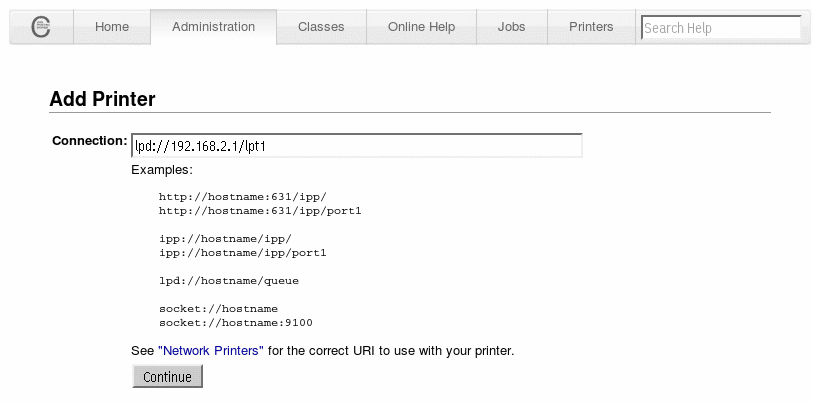
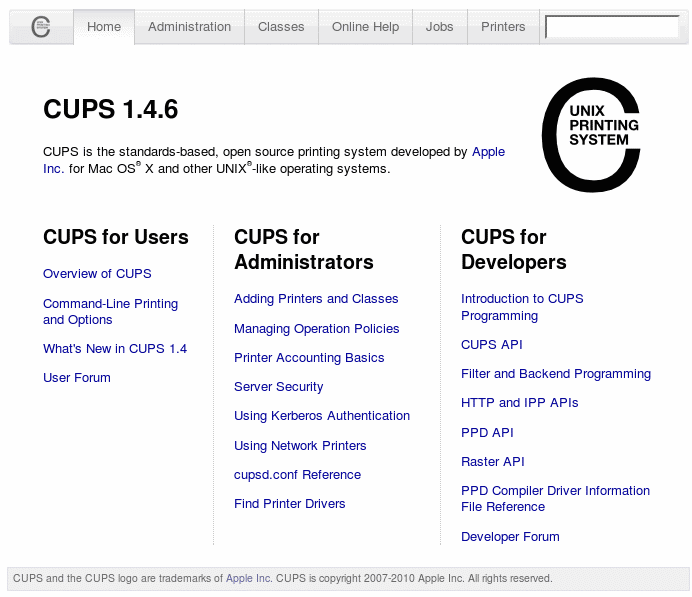
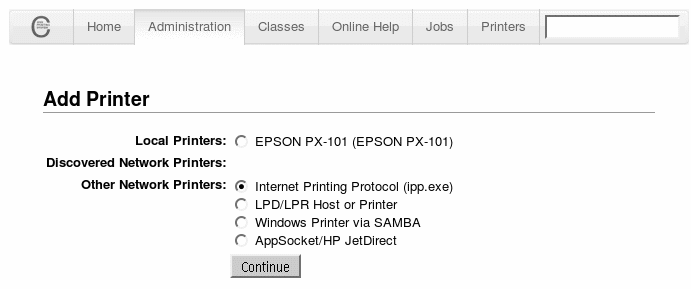
I recommend using the CUPS browser interface to Add a Printer. Fire up your browser and point it at http://localhost:631/ (cups home page) and when that has loaded click Add Printer.
I added the following (network connected) Canon PIXMA P4000 colour inkjet (raster) printer and will be using this printer as the example. The text after the "-" is to outline the purpose
Name: PIXMA - what you want to call the printer
Location: Router LPT1 - where it is physically located; ie connected to the Router's LPT1 port
Description: Canon PIXMA iP4000 Inkjet - brief description of printer
Continue - click when happy with above section
Device: Choose an appropriate selection for device connection: ie: LPD/LPR Host or Printer
IPP for USB printers - the detected printer should be available for selection. For other types of attachment, more information will be required.
- Example: Device URI: lpd://192.168.2.1/lpt1 - address of device for LPD printer
Continue - click when happy with above section
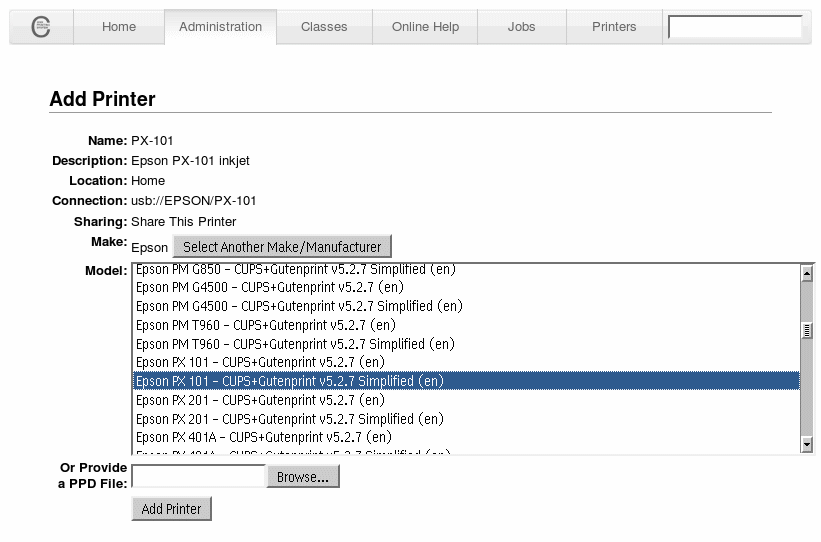
Make: Canon - select printer make - for USB printers, an attempt will be made to confirm the correct PPD file to use
Continue - click when happy with above section
Model: Canon PIXMA iP4000 - CUPS+Gutenprint v5.2.0-beta3(en) Simplified - select correct driver; Simplified recommended
Add Printer - click when happy with above section
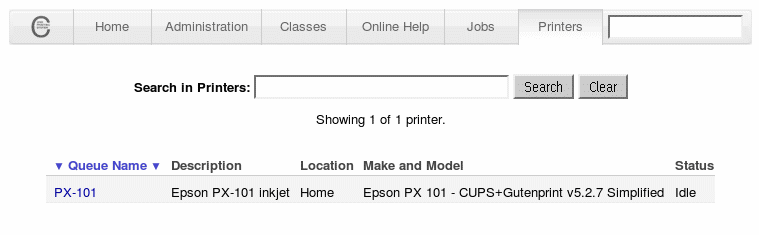
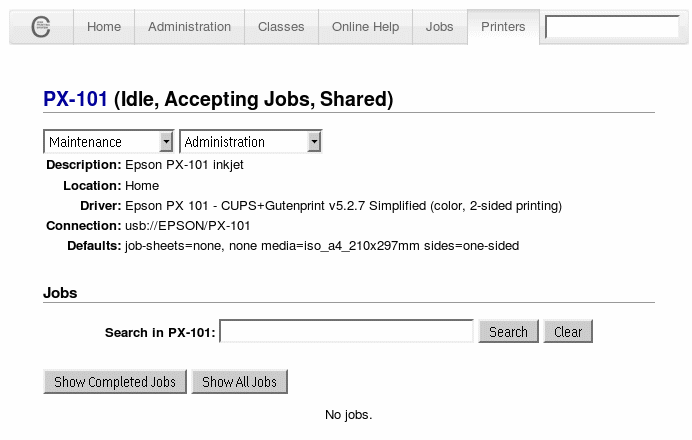
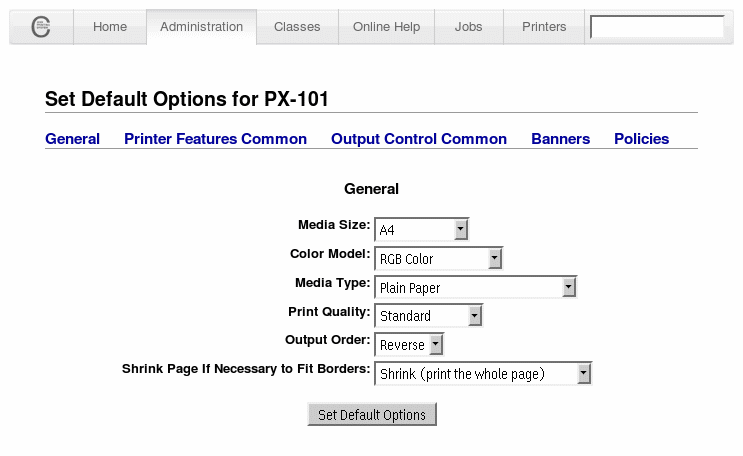
After clicking Add Printer the interface informs me that the printer has been added and loads the options for the printer - this can take a little while. It is a good idea to have a look through and make sure the options look useable - especially Media Size, Resolution and Image Type. When satisfied click Set Printer Options and the interface reports "Printer PIXMA has been configured successfully."
I then clicked on the Printers tab and then clicked the Print Test Page button. Shortly after the Test Page popped out of the printer looking fine.
Well, that is the very easy bit finished...
Referring to the readme.os2 file I used the command line to print a 2 page document; I opened a command line window in \cups\bin and gave it a try:-
[H:\cups\bin]lpr -P PIXMA \cups\share\cups\data\PReCS20.ps
After a short wait the printer burst into action and delivered 2 pages of output that look fine.
That is the next easy bit finished...
Step by step CUPS printer setup in web admin program (USB or Network connected)
First of all start your web browser and point it at http://localhost:631/

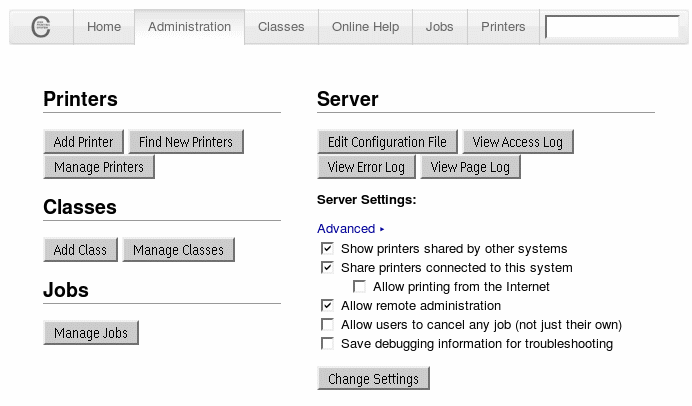
Now click on the administration tab

Then click on "Find new printers"

In this case, as my printer is both connected to the network and connected by a USB cable to my PC, both connections are listed - select whichever you wish to set up at this point.

A description is already filled in for you, but feel free to change the text as you wish.

Select the correct printer driver - in my case as my Officejet 6310 is not listed I use the OJ 7110 instead - I have found this works fine
(you can always change this later to find the best match for your printer).

Set up the default printer options that you want to use.

That's it ! You have now set up your printer under CUPS - press the send test page and hopefully you'll get a nice printout. The next stage is now to set up the OS/2 print object to print to the CUPS Daemon - see those details later in this documentation.
Creating a Desktop Printer Object to use with CUPS
Now to hook CUPS up to the rest of the system so that CUPS can be used for output by applications such as OpenOffice Writer (wordprocessor) and PMView (images).
1] Unzip the eCUPS printer driver package (At time of writing ecups-20081228.zip) into h:\os2\dll\ecups - this avoids any problems with any existing postscript driver in h:\os2\dll\pscript.
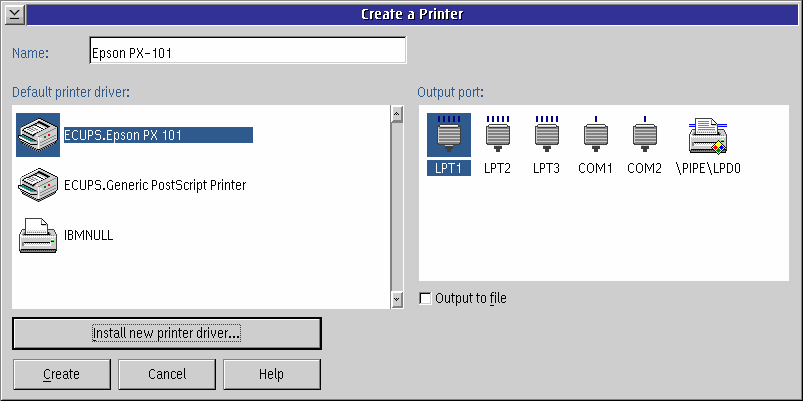
2] Open the Desktop -> Templates folder and drag the Printer template to the Desktop to start the Create printer routine. You will need to point the install routine to h:\os2\dll\ecups and click Refresh in order to see the list of printers.
Name the printer - PIXMA in this case
Select the output port - I used LPT1 initially and installed the cups printer port later
Select the (pscript) driver for the printer - Canon PIXMA iP4000
3] Unzip the eCuPS printer port package (currently cupsportdriver-20080628.zip) putting the files into these locations
cups.pdr into h:\os2\dll
cupslpr.exe into h:\tcpip\bin
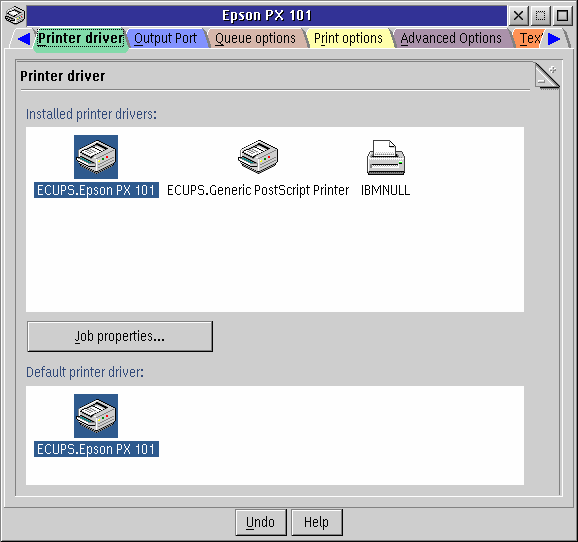
4] Right Mouse Button on the new Desktop Printer Object and select Properties
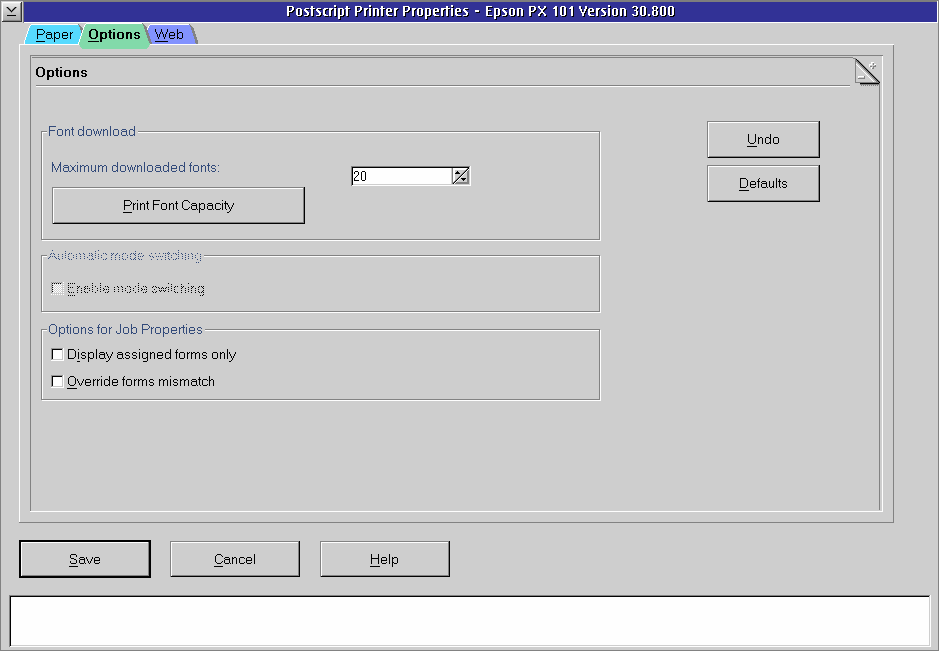
Select Printer driver tab Check the Default printer driver is correctly selected Set Job Properties: Paper Size, Tray, Media Type, Resolution must match the settings in the CUPS printer - and Save
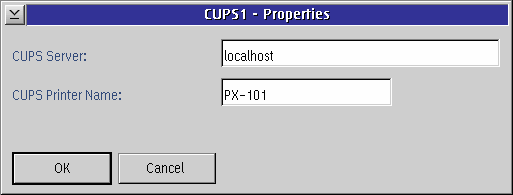
Select Output port tab Click Install new port button Select the CUPS1 port and click Install
- if the port is not visible but the CUPS.pdr file is in \os2\dll Click New port drivers and set the directory to \os2\dll and click Find. The CUPS ports should appear.
The settings for the CUPS port are
Host: localhost - or use 127.0.0.1 Printer: PIXMA (this should be the same name as used for creating the CUPS printer in the CUPS admin above)
Close Printer Properties
That should be setup complete so time to print a test page
Verify that cupsd.exe is running *Before* testing
Drag'n'Drop \cups\share\cups\data\testprint.ps onto the new Desktop Printer Object
Select Printer-specific in the following dialog
You should get the CUPS Test Page printed from your OS/2 Desktop Printer Object
The next test is to print a multiple page document from your favourite wordprocessor, followed by printing any other document types from an appropriate application, eg Photos from PMView, using your new OS/2 Desktop Printer.
Attachments (19)
-
cupsweb03a.png
(10.6 KB
) - added by 14 years ago.
CUPS - Add Printer (2)
-
obj_create01.png
(4.8 KB
) - added by 14 years ago.
WPS - Install New Printer Driver
-
obj_create02.png
(4.3 KB
) - added by 14 years ago.
WPS - Create a Printer
-
obj_port01.png
(4.8 KB
) - added by 14 years ago.
WPS - Install New Port
-
obj_port02.png
(1.4 KB
) - added by 14 years ago.
WPS - CUPS Port Properties
-
obj_port03.png
(5.7 KB
) - added by 14 years ago.
WPS - Printer Output Port
-
obj_props01.png
(5.7 KB
) - added by 14 years ago.
WPS - Printer Driver
-
obj_props02.png
(9.0 KB
) - added by 14 years ago.
WPS - Printer Job Properties
-
obj_props03.png
(5.9 KB
) - added by 14 years ago.
WPS - Printer Driver Properties
-
cupsweb01.png
(20.8 KB
) - added by 14 years ago.
CUPS web interface (Home page)
-
cupsweb02.png
(14.8 KB
) - added by 14 years ago.
CUPS web interface (Administration page)
-
cupsweb03.png
(12.2 KB
) - added by 14 years ago.
CUPS - Add Printer (1)
-
cupsweb04.png
(9.1 KB
) - added by 14 years ago.
CUPS - Add Printer (3)
-
cupsweb05.2.png
(12.8 KB
) - added by 14 years ago.
CUPS - Add Printer (4)
-
cupsweb06.2.png
(11.8 KB
) - added by 14 years ago.
CUPS - Add Printer (5)
-
cupsweb07.png
(8.3 KB
) - added by 14 years ago.
CUPS web interface (Printers page)
-
cupsweb08.png
(12.7 KB
) - added by 14 years ago.
CUPS web interface (printer details)
-
cupsweb05.png
(12.8 KB
) - added by 14 years ago.
CUPS - Add Printer (4)
-
cupsweb06.png
(11.8 KB
) - added by 14 years ago.
CUPS - Add Printer (5)
Download all attachments as: .zip